Let's go back to the very beginning.
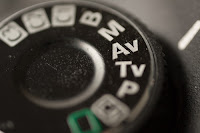
DSLRs and some point-and-shoot cameras have a wheel of shooting settings at the top of the camera. These can vary from brand to brand, but as a general rule the symbols will be close close, if not exactly the same. Some cameras have more options. Some have fewer. Here, we will go over some of the more popular options and how they can be of use to you.
AUTO or A+: Automatic mode. This means the camera does everything for you. I shot exclusively in AUTO for the first few years I had a digital camera simply because I didn't know any better. I had grown up shooting in film, and while the principles are the same, some of my knowledge got "lost in translation" when I made the move to digital. Is Automatic the ideal setting because the camera chooses the settings that it believes are best for the situation? Of course not, and I'll go into more detail on this in later posts.
DISABLING FLASH: This works exactly the same was as AUTO, except the camera will not use the flash, so it is ideal during performances or other situations where flash is either not allowed or gets in the way of your image. The drawback of this option is that your pictures may come out dark if you are in a low light situation. Shooting in Manual can help you overcome this, but for now let's stick with baby steps.
LANDSCAPE: This mode comes in very handy when you have a scene where you want everything to be in focus (both things near and far). When shooting in Manual mode, this is where you would adjust your f-stop to a higher number for a greater depth of field, but for people wanting to keep things simple or who haven't learned enough about Manual, this can be an excellent tool.
MACRO: If you're into nature photography and getting up-close and personal with flowers, seashells, or other subjects that are teeny tiny, this is a fun mode to shoot in! Keep your background in mind because a busy background can make seeing your subject difficult in the final picture, so try to keep it simple.
ACTION: In layman's terms, this is the mode you want to use if you're photographing something that is moving. Essentially, what it does is speed up the shutter speed so you will have less blur in your image. Shooting action shots can be tricky in and of themselves simply due to the time it takes a digital camera to focus before taking the picture. There are several tricks in avoiding this such as pre-focusing by only pressing the shutter button half-way to allow the camera to focus before pressing it fully to take the picture. Don't worry. We will cover this much more thoroughly later on.
NIGHT: This is another one of those modes I thought would be helpful in my early days of photography and settled on it being "useless" instead. In theory, this mode compensates for low-light situations by using a slower shutter speed and higher ISO, but I had very little success actually putting it into practice. Beware that any movement in the camera will usually result in a blurry photo, so stabilizing the camera with a tripod or setting it on a solid surface will help you get a cleaner image.
Beyond the basic settings, we get into the semi-automatic settings where you take over adjusting some of the settings while the camera handles others, giving you a little more control over how your pictures will turn out without taking the full responsibility of going Manual.
PROGRAM: This mode allows you to choose the ISO (film speed) and White Balance. Depending on what you choose, the camera will automatically choose the correct Aperture (f-stop) and shutter speed for the conditions.
S or TV: Shutter Priority mode. This mode allows you to dictate how fast or slow the shutter will close while the camera automatically chooses the best aperture (f-stop) for the current conditions. (The higher the shutter number, the faster the shutter will open and close. The smaller the number, the slower the shutter will open and close.) I could go into so much detail about how to use this mode because I used it a great deal in my early days, but for now I'll just say that while the shutter is open, it lets light in and any movement during that time will cause things to blur. For a short shutter speed, there is very little chance to have blur, but there is also very little time for light to reach the sensor which can sometimes result in a sharp, but dark, picture. Learning to use Shutter Priority mode is all about finding the happy medium for your desired shot.
 AV: Aperture Priority. This mode allows you to set your desired aperture (f-stop), ISO, and white balance while the camera chooses the appropriate shutter speed. This is another one of those shooting modes I used a great deal while learning how to photograph exclusively in manual. We will be going into f-stops later, but just to get you started, the smaller the f-stop number, the wider the aperture opens when you take a picture. (I know, it seems counter intuitive, but hang with me.) Remember that depth of field we briefly mentioned in Landscape Mode? This is it. The depth of field is everything within the viewfinder; the things close to your camera (such as your subject) as well as the things far away (such as the background or landscape).
 The wider the aperture opens (the lower the f-stop number), the fewer thing it can focus on when it takes a picture. Likewise, the smaller the aperture opens (the higher the f-stop number), the more things it can focus on when taking a picture. Playing with the f-stop is my absolute favorite photography trick! Shooting with a low f-stop allows me to focus on one single thing and "blur" out everything else because it's simply not in focus. The picture at the right is an excellent example of a high f-stop number with a greater depth of field vs a low f-stop number with a shallow depth of field. Notice how a greater depth of field allows the camera to take everything into focus (including the yucky background) in the left image, while the right image uses a shallow depth of field and "hides" everything except the flower?
Beyond these modes is the dreaded Manual mode. I shivered at the thought of using this until I was forced to play with it for my photography classes. I can proudly say that I shoot almost exclusively in Manual now, but it took me what felt like ages before I finally got good enough at balancing all the different elements to be able to manipulate the camera into taking really good pictures.
Working with a shallow depth of field (low f-stop number) means you have to be very
careful about where your focus lands. In the LEFT picture you can see that I accidentally
focused on the tail instead of the unicorn's horn (RIGHT). A great picture can turn blurry in
a hurry if you use too shallow of a depth of field and accidentally focus in the wrong spot.
*TIP*: Start your photography journey by learning about the mode settings on your particular camera, and how to improve your pictures by choosing the correct one for your current environment.
 |
| Please visit my website www.AshleyGesslerSHD.com |


No comments:
Post a Comment